SimsCrate
How to Enable Script Mods
Script mods are some of the most useful mods for The Sims 4. They can add new menus, deeper gameplay systems, custom settings, extra interactions, and features that regular custom content cannot provide. But before script mods can work, they need to be allowed in the game settings.
If you installed a script mod and nothing appears in the game, the problem is often simple: script mods are disabled, the file is in the wrong folder, or the mod was unpacked incorrectly. This guide explains how to enable script mods and install them the right way.
What Are Script Mods?
Script mods are advanced mods that use special files to change or expand how The Sims 4 works. They are different from simple custom content like hair, clothing, makeup, or furniture.
Regular CC usually adds visual items. Script mods can add new gameplay features, custom menus, extra commands, new systems, or background functions that affect how the game behaves.
You can usually recognize a script mod by the .ts4script file type. Many script mods also include .package files, and both file types may be needed for the mod to work correctly.
Step 1 - Open The Sims 4 Settings
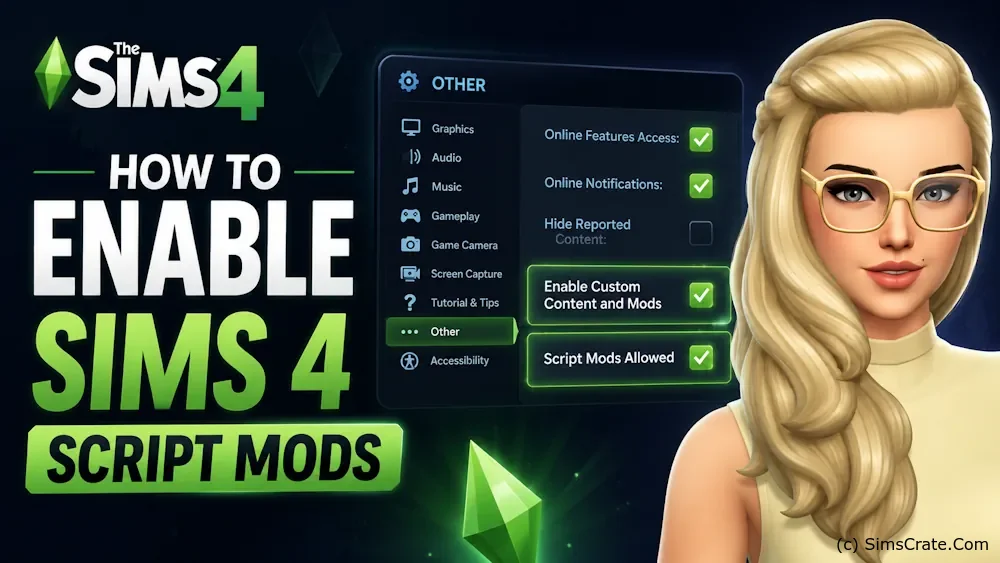
Start The Sims 4 and wait until you reach the main menu. Then open Game Options and go to the Other section.
This is where The Sims 4 keeps the main settings for custom content and script mods.
Step 2 - Enable Custom Content and Mods
First, turn on the option called Custom Content and Mods. This setting allows the game to load regular .package files from your Mods folder.
This option is important even for script mods, because many script mods include package files together with the script file.
Step 3 - Enable Script Mods Allowed
Next, turn on the option called Script Mods Allowed. This is the main setting that allows .ts4script files to work in The Sims 4.
If this option is disabled, script mods will not load, even if the files are placed in the correct folder.
After enabling both settings, apply the changes and close the game completely.
Step 4 - Restart the Game
The Sims 4 usually needs a full restart after changing mod settings. Close the game, open it again, and check if the mod list appears when the game starts.
If the game shows a list of installed mods, that usually means it can see the files inside your Mods folder.
Step 5 - Place Script Mod Files in the Correct Folder
Script mods should be placed inside the Mods folder. The folder location is: Documents/Electronic Arts/The Sims 4/Mods.
Most script mods should not be placed too deep inside subfolders. A safe structure is something like: Mods/Mod Name/file.ts4script.
If you place the script file inside too many folders, the game may not read it correctly. If a script mod does not work, try moving it closer to the main Mods folder.
Do Not Extract .ts4script Files
This is one of the most common mistakes. A .ts4script file may look like something you can open or extract, but you should leave it as it is.
You may need to extract the main downloaded archive first, but after that, keep the .ts4script file unchanged. Do not unpack the .ts4script file itself.
What Files Should You Install?
Some script mods come with only one .ts4script file. Others include both .ts4script and .package files. If the mod includes both, you usually need to place all required files into the Mods folder.
Do not install only the script file if the creator included extra package files. The mod may be missing menus, icons, tuning data, or gameplay parts without them.
Check the Creator's Instructions
Not every script mod is installed in exactly the same way. Some creators may ask you to keep all files inside one folder. Others may say that the files must be placed directly inside the Mods folder.
Before assuming the mod is broken, check the download page or readme file if one is included. A short note from the creator can save a lot of time.
Why Script Mods May Not Work
If a script mod does not appear in the game, check these common causes:
- Script Mods Allowed is not enabled.
- The game was not restarted after changing settings.
- The .ts4script file was extracted by mistake.
- The mod is placed too deep inside subfolders.
- Only part of the mod was installed.
- The mod is outdated after a game update.
- The mod requires another file or library.
- Another mod is conflicting with it.
What to Do After a Sims 4 Update
Script mods are more likely to break after game updates than simple CC. If The Sims 4 was recently updated and the game starts crashing, freezing, or showing errors, check your script mods first.
Visit the mod creator's page and see if there is a newer version. If the mod has not been updated yet, it may be better to remove it temporarily until a compatible version is available.
Delete localthumbcache.package After Changes
After removing, updating, or replacing script mods, it is a good idea to delete localthumbcache.package from the main Sims 4 folder.
You can find it here: Documents/Electronic Arts/The Sims 4/localthumbcache.package.
Delete this file while the game is closed. The game will create a new one automatically. This can help clear old cached data from outdated or removed mods.
How to Test Script Mods Safely
If you are installing a large script mod, test it before adding many other new files. Start the game, load a test save, and check whether the mod menu or interaction appears.
It is also smart to back up your Saves folder before testing major gameplay mods. Most script mods are safe when installed correctly, but backups are always useful if something goes wrong.
Final Notes
Enabling script mods in The Sims 4 is easy once you know where the setting is. Turn on Custom Content and Mods, enable Script Mods Allowed, restart the game, and place the files correctly in the Mods folder.
The main thing is to keep script mods updated and organized. After game updates, always check important script mods first, because they are often the first ones that need a new version.